Update
This method runs perfectly on PS4. But for PS5, you can only run PS4 titles since PS5 games require an internal NVMe SSD as game storage.
After getting my hands on the PS4, I couldn’t help but buy a ton of games. I quickly ran out of space on the 500GB internal hard drive, so I decided to upgrade it to a 1TB drive. However, now even the 1TB drive is almost full, and I don’t want to go through the hassle of upgrading to a 2TB drive. Plus, I have no other use for the 1TB WD Black drive that I took out, so it’s quite frustrating.
After doing some research, I discovered that in a recent system update, the PS4 added a feature that allows you to format a USB storage as extended storage. This means you can use a USB 3.0 external hard drive to install games. I’ve always had some bias against using external hard drives, but this feature is actually a great way to expand the storage.
When it comes to expanding storage on a regular PC, there are many solutions available. For example, I could set up a shared folder using the SMB protocol, which is natively compatible with Windows and macOS. For Linux, all I need to do is load the cifs.ko module. Of course, using NFS is also a viable option. If encryption is required or if I need direct access to a raw disk, I could use iSCSI. Unfortunately, none of these methods are possible on a PS4, as it is currently not jailbroken.
So, I started thinking if it’s possible to expose some of these methods to the PS4 through USB. For example, imagine a device that acts as a USB device and has a Gigabit Ethernet interface, allowing it to access an iSCSI target on the local network. Then, through some magic, it would pass the iSCSI target’s disk device through to the USB, making the PS4 recognize it as a large storage.
To explore the feasibility of this idea, I bought an RK3399 board from Taobao. It comes with a USB Type-C interface and a Gigabit Ethernet interface. It also has decent CPU performance, although I haven’t been able to find a working Mali GPU driver yet. It supports both Android and Linux operating systems.
After I received the board, I found that it came pre-installed with both Android and Ubuntu dual systems. Without hesitation, I decided to reinstall the system. I had no need for Android, and I didn’t really want to use Ubuntu either, so I prepared an SD card and put the root file system of ARM64 Arch Linux ARM into it. Using Rockchip’s tool, I modified the content of the parameter partition, specifying the SD card as the root partition, and then restarted the device. After the boot process finished, I was able to install arch-install-scripts and completely remove Ubuntu from the eMMC. However, remember to backup the /system directory of Ubuntu, as I would still need the firmware in it later (I have no idea why it’s located at /system/etc/firmware instead of /etc/firmware; the modified Rockchip kernel is quite strange). If there is no need to manipulate U-boot, this should be sufficient. After restarting, I entered Arch Linux and performed basic configurations (network, pacman source, etc.). If you want to use the full-featured U-boot, you can refer to the information in this link to compile the u-boot provided by Rockchip yourself. The one provided by Firefly is heavily trimmed and basically unusable.
Then, I tried to figure out how to transform the USB-C interface into a fake USB drive. Initially, I thought I would need to write a kernel module, but after reading the documentation, I realized it was much simpler than that: the kernel exposes the configuration interface of the USB Gadget through a file system for users to manipulate. I just needed to create some files, make some links, and voila, I can accomplish it! I will put the code and comments together:
|
|
Take out your USB 3.0 Type-C cable, connect RK3399 to your computer, and then run this script. If everything goes well, you should be able to see the new hardware, and the kernel will probably have these outputs:
|
|
It’s done! Isn’t it simple?
Next, let RK3399 access a remote disk. Of course, you can also add a SATA hard drive to RK3399, but it seems more convenient to use a portable hard drive directly (lol). In principle, you can use NFS/CIFS or similar network file systems to access a partition on NAS, then DD out a large sparse disk image, format it, and use this file directly as a disk. However, when I tried this, writing a 1GB animation file initially surged to 300MB/s but dropped to 0 within two seconds, and I saw a kernel panic error from RK3399’s serial output.
Indeed, in this case, we should use iSCSI! To enable iSCSI target service on Windows, you can choose to switch to a Server version of Windows, which comes with iSCSI target server functionality. If you can’t afford it or don’t want to switch, you can use some user-space software to implement it, such as the free StarWind for personal users. However, it seems that StarWind does not support creating sparse img files, which is a bit annoying. On Linux, you can refer to the Open iSCSI section on the Arch Wiki for information. I won’t go into details about configuring the iSCSI target service here; it’s relatively simple, just use CHAP for user authentication, no need for complexity.
Regarding RK3399, first send a sendtargets request to the iSCSI server:
|
|
Once you get the target list, you can log in:
|
|
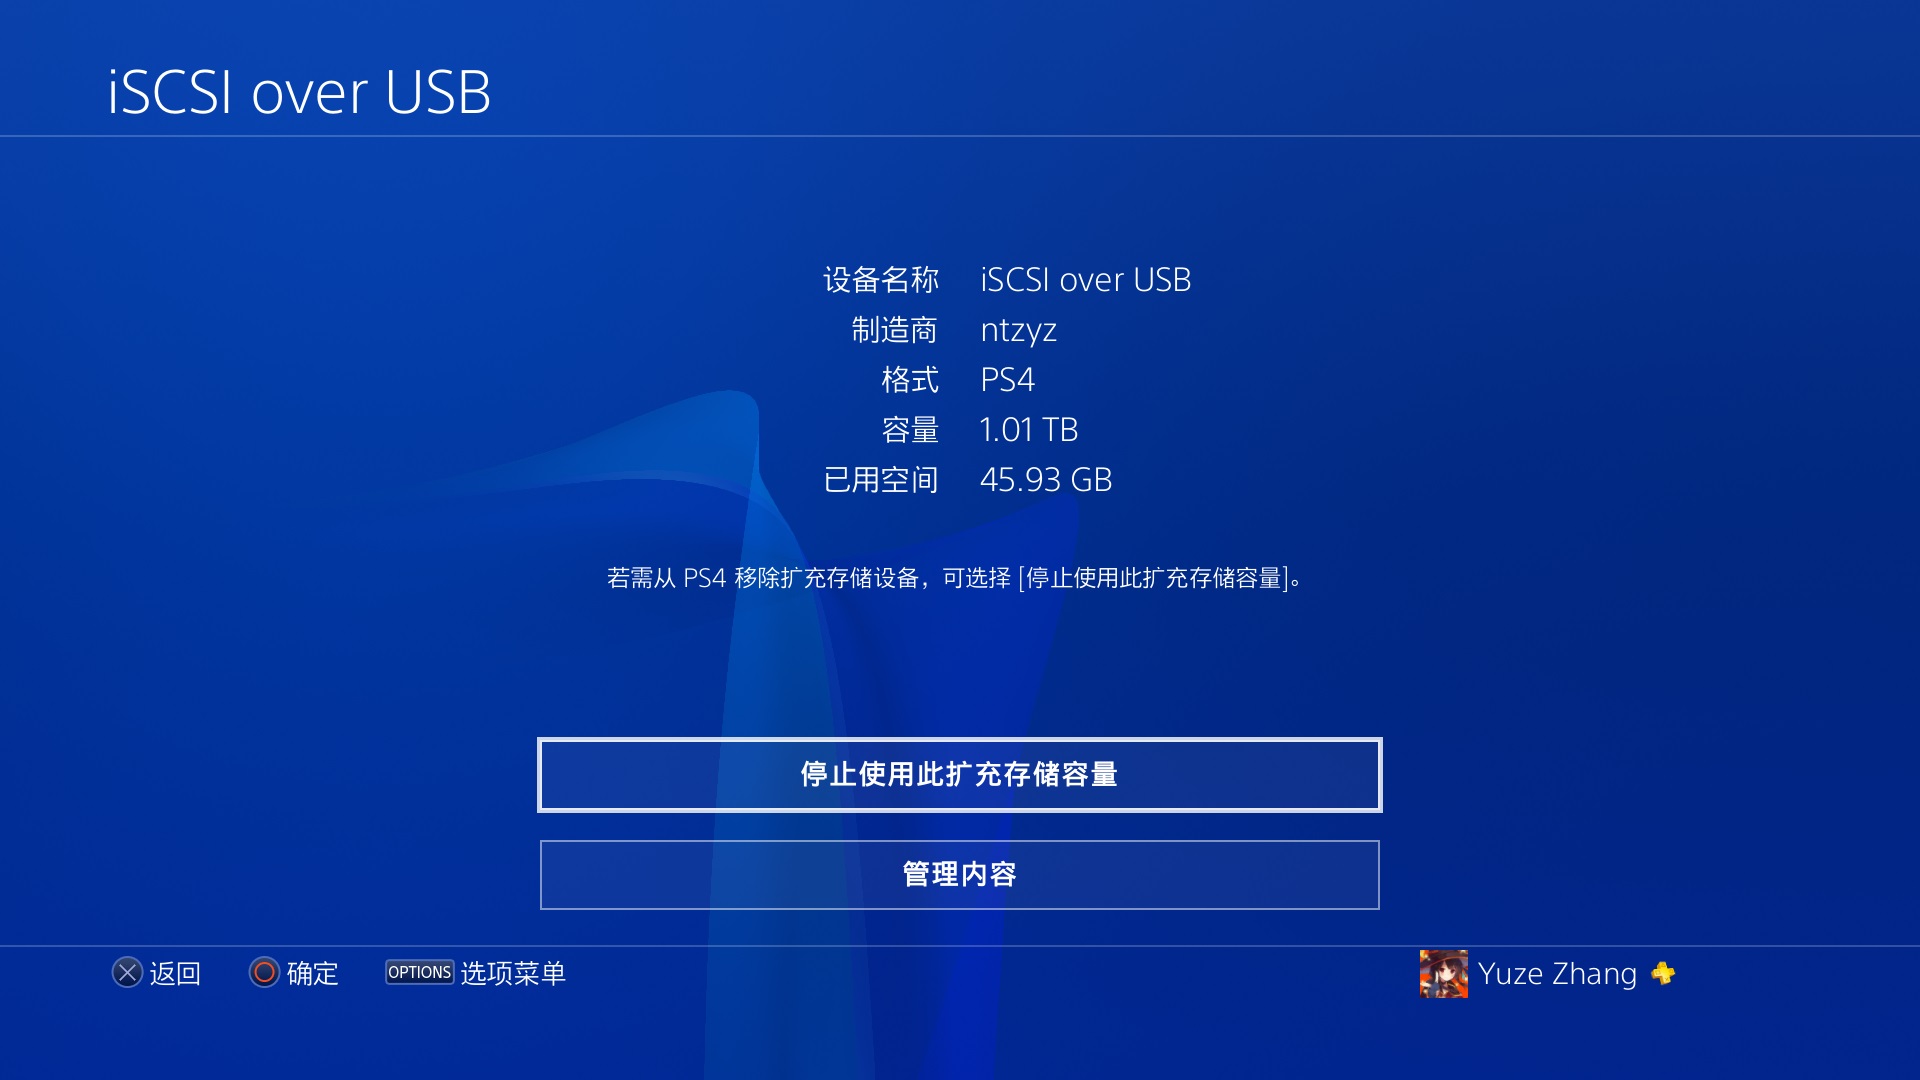
As expected, there will be a lot of kernel logs output at this time, such as finding sda. At this point, you have successfully created a connection with the server, and all changes on sda will be written to the remote disk. As long as you use this device file as the file corresponding to lun.0 of Mass Storage in Gadget, our ultimate goal of a USB interface remote disk is achieved!
Unplug the USB from the computer, plug it into the PS4 console, go to Settings -> Peripheral Devices -> USB Devices, and you will see a mobile hard drive named iSCSI over USB with the manufacturer ntzyz. Format it as extended storage, and then you can use it. After testing, moving NieR Automata to this extended storage and playing it did not show any noticeable difference in user experience.